Sample Worlds
Sample Worlds are the interactive layer of xPRIMEray's public presence: navigable scene configurations where a visitor can run the renderer, toggle overlays, and observe transport phenomena directly.
Each world demonstrates one specific finding from the Observatory Atlas. The static artifact provides the evidence; the world makes it interactive.
Status: All five worlds are at Design proposal stage. No runtime implementation exists. Each folder contains a world.md, overlays.md, and config.schema.json.
World Summary
| # | World | Scene | Atlas Chapter | Priority | Status |
|---|---|---|---|---|---|
| 1 | Dual Reality View | test-overspace-wormhole-witness-fixture.tscn |
Ch 1 | 1 | Design proposal |
| 2 | Observer Disagreement | test-grin-basic-visual-minimal-offaxis-observe.tscn |
Ch 2 | 2 | Design proposal |
| 3 | Hermetic Closure | test-hermetic-curved-room.tscn |
Ch 3 | 3 | Design proposal |
| 4 | Cathedral Probe | test-domain-resolver-stress.tscn |
Ch 5 | 4 | Design proposal |
| 5 | Transport Coherence Basin | test-domain-resolver-stress.tscn |
Ch 4 | 5 | Design proposal |
Shared Overlay Vocabulary
All worlds draw from the same overlay set. Each world's overlays.md specifies which modes apply.
| Overlay | Code Name | What it Shows |
|---|---|---|
| Straight Ray | straight_ray |
Reference transport — no curvature |
| Curved Ray | curved_ray |
GRIN null-geodesic integration |
| Dual Reality | dual_reality |
Curved main + straight reference inset |
| Observer Disagreement | observer_disagreement |
Per-pixel delta: where the two transports differ |
| Hermetic Closure | hermetic_closure |
Classification overlay: hit / escape / budget-exhausted |
| Transport Coherence | transport_coherence |
Instability heatmap: oracle convergence status |
| Heatmap Normals | heatmap_normals |
Curvature accumulation per pixel |
| Ray Path Traces | ray_traces |
Explicit ray trajectory lines |
| Cathedral Probe | cathedral_probe |
Six-layer composite diagnostic |
| Atlas Labels | atlas_labels |
Portal glyphs, field markers, region annotations |
| Validation HUD | validation_hud |
Live closure %, budget pressure, classification counts |
Dual Reality View
Visitor question: What does a wormhole look like, and how do we know the bending is real?
Scene: test-overspace-wormhole-witness-fixture.tscn
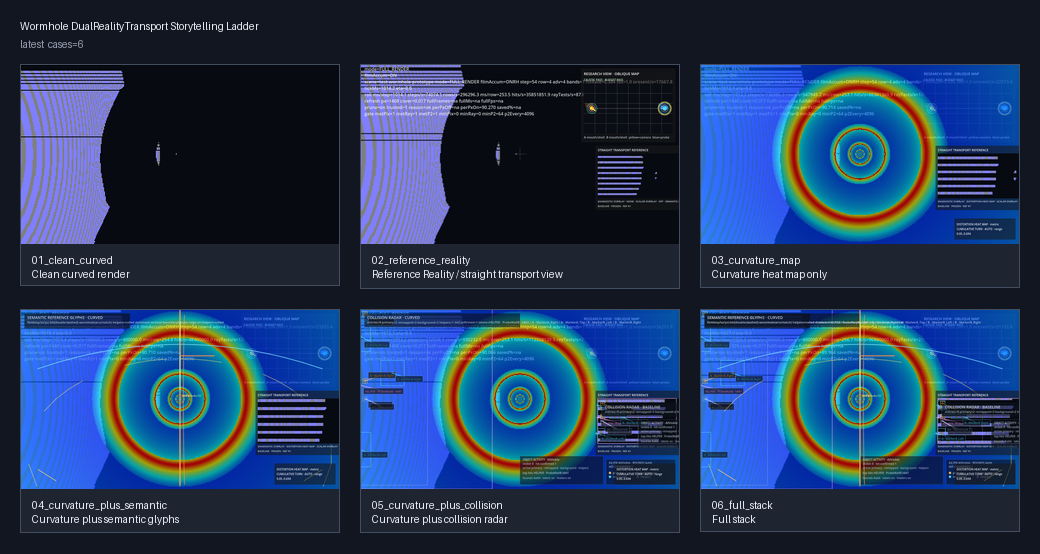
The visitor starts with the bare curved render. A toggle adds the Reference Reality inset — a frozen straight-ray render of the same scene. The gap between the two is the wormhole's optical effect.
Core interaction: Toggle the Reference Reality inset on and off.
Supported artifacts: wormhole-dual-reality-story.png, wormhole-structure-observatory.png
Overlays: curved_ray → dual_reality → heatmap_normals → atlas_labels → validation_hud
Validation question: Is the curvature hot zone at the portal boundary (expected) or at the throat?
Missing screenshots: Split-screen drag interaction; camera path showing disagreement changing with viewing angle.
Design files: sample_worlds/dual_reality_view_world/ — world.md · overlays.md · config.schema.json
Observer Disagreement
Visitor question: How much does curved transport change what you see vs. straight — in pixels?
Scene: test-grin-basic-visual-minimal-offaxis-observe.tscn + straight variant
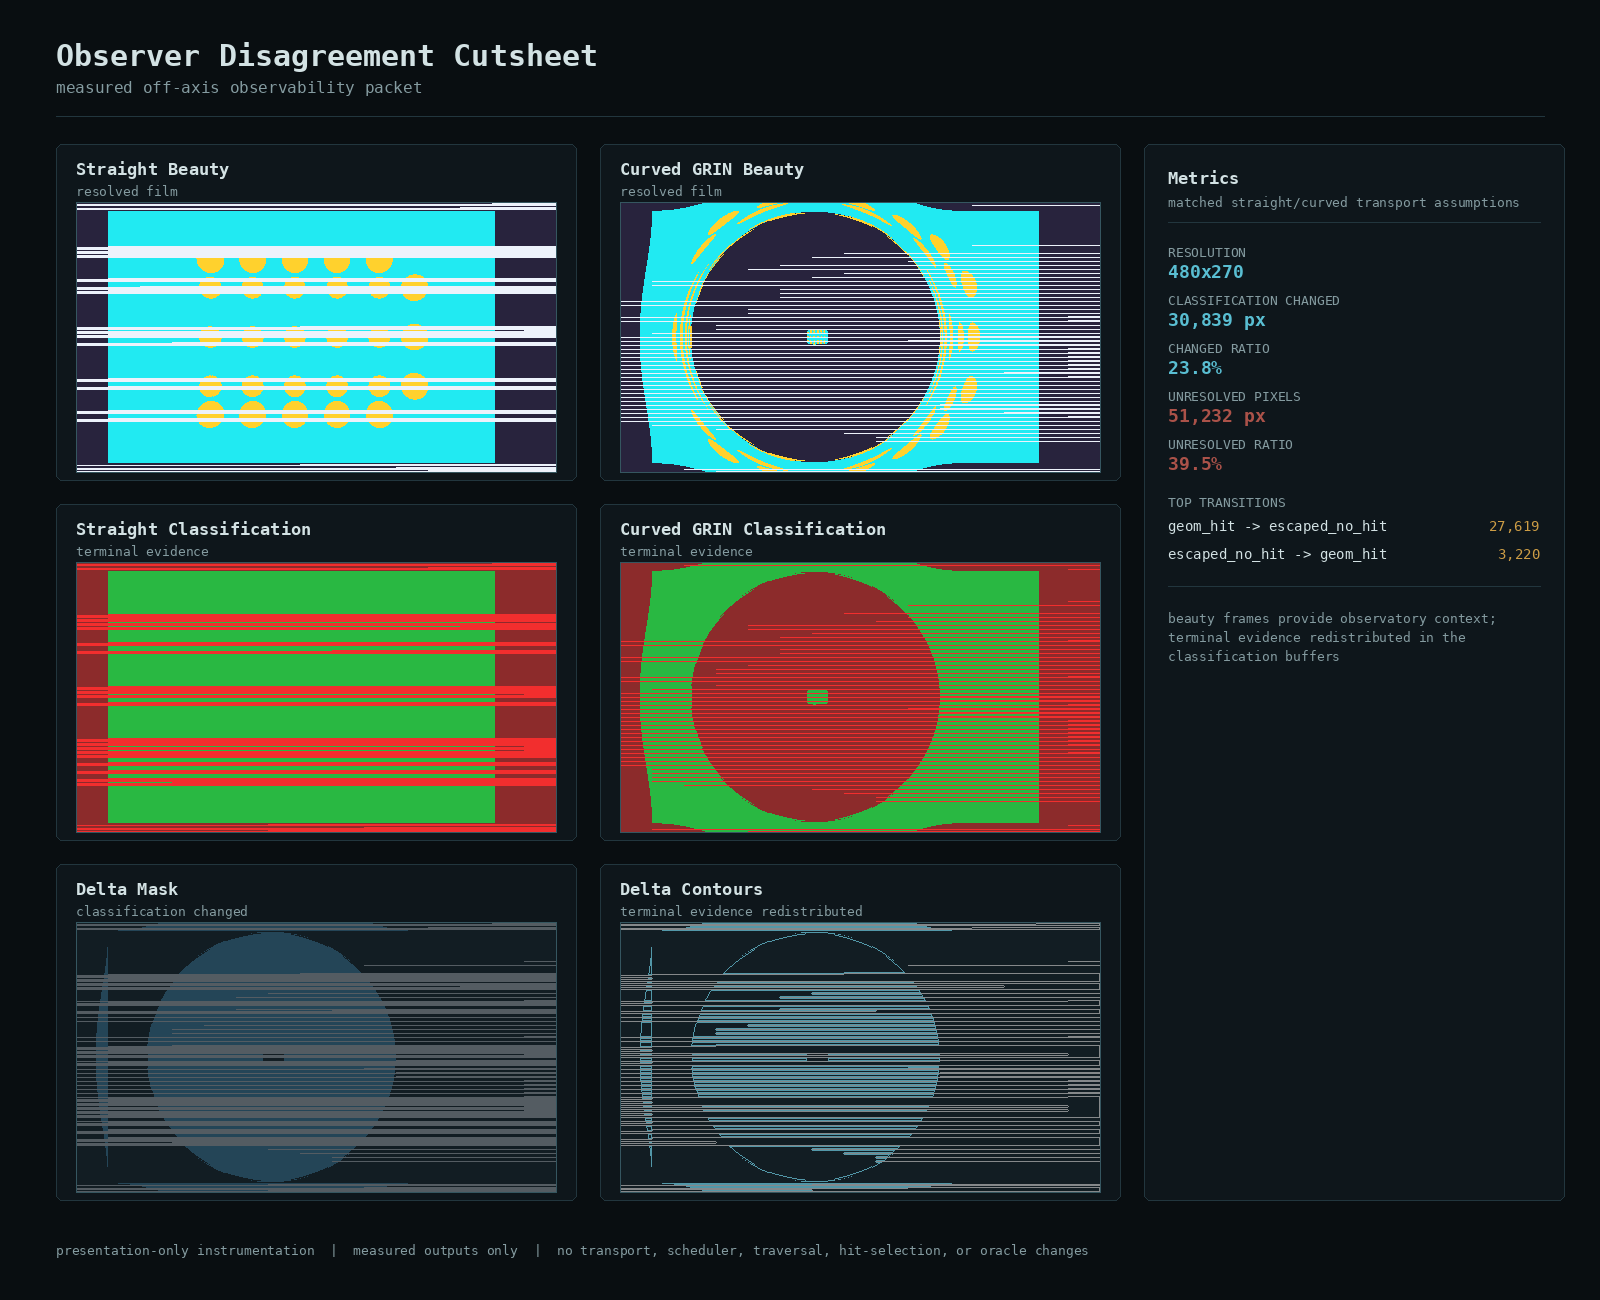
Three-mode toggle: curved / straight / disagreement delta. The Validation HUD shows live classification counts. The visitor sees ~30,839 blue-tinted pixels and can compare to the reference dataset.
Core interaction: Toggle between curved, straight, and disagreement-delta modes.
Supported artifacts: observer-disagreement-contact-sheet.png, datasets/observer-disagreement.json
Overlays: curved_ray → straight_ray → observer_disagreement → validation_hud
Validation question: Total disagreement ≈ 23.8%; dominant transition geom_hit → escaped (9:1 asymmetry)?
Missing screenshots: A second camera pose for the angular-dependence experiment; live pixel-count HUD capture.
Design files: sample_worlds/observer_disagreement_world/ — world.md · overlays.md · config.schema.json
Hermetic Closure
Visitor question: When does the integrator fail silently, and what does failure look like?
Scene: test-hermetic-curved-room.tscn
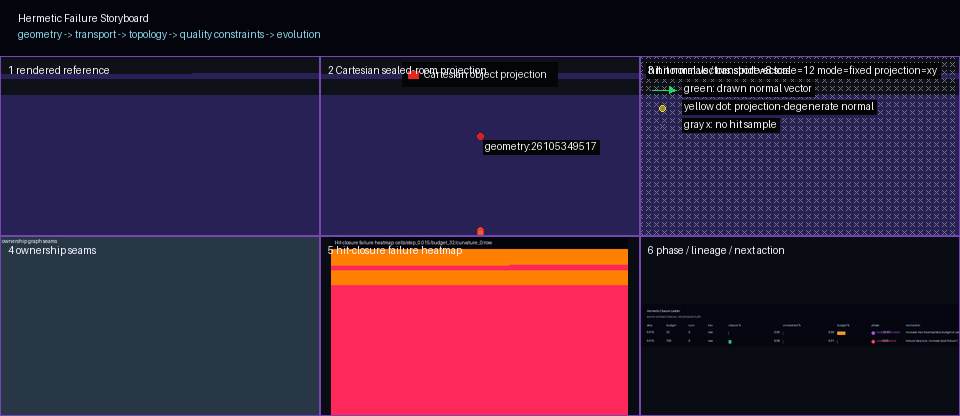
Budget selector with three presets: 32 (0% closure), 300 (cliff edge), 700 (100% closure). The hermetic_closure overlay colors pixels green/blue/red. The Validation HUD is mandatory — it is the only reliable detector of the failure mode.
Core interaction: Switch between budget presets; observe HUD closure percentage change.
Supported artifacts: hermetic-hit-closure-storyboard.png, hermetic-hit-closure-recovery.png, validation/hermetic-hit-closure.md
Overlays: hermetic_closure (default on) + validation_hud (required) → heatmap_normals → ray_traces
Validation question: Budget=700: 100% closure (plateau). Budget=32: 0% closure (budget_saturated).
Missing screenshots: Side-by-side render with budget=32 left / budget=700 right, both HUDs visible.
Design files: sample_worlds/hermetic_closure_world/ — world.md · overlays.md · config.schema.json
Cathedral Probe
Visitor question: How do you diagnose a renderer that produces wrong pixels without crashing?
Scene: test-domain-resolver-stress.tscn
The world provides individual layer toggles for the six Cathedral Probe components plus a stride selector. The visitor builds the composite progressively and can observe the scheduler resonance collapse live by switching from stride=1 to stride=4.
Core interaction: Enable Cathedral Probe layers one at a time; toggle stride to observe resonance.
Supported artifacts: doe-scheduler-resonance-heatmap.png, doe-scheduler-resonance-stride-plot.png, cathedral-probe-contact-sheet.png
Overlays: Six Cathedral Probe layers individually + cathedral_probe (composite) + validation_hud
Validation question: At stride=4, step=0.015: band coverage ≈ 0.22–0.45%. At stride=1: 20–33%.
Missing screenshots: Per-layer individual screenshots at stride=4 showing the resonance stripes.
Design files: sample_worlds/cathedral_probe_world/ — world.md · overlays.md · config.schema.json
Transport Coherence Basin
Visitor question: Where in the scene does transport refuse to converge — and why there?
Scene: test-domain-resolver-stress.tscn
The transport_coherence overlay shows convergence status per pixel. The 289 instability regions appear as two symmetric bright bands. The IOR gradient experiment lets the visitor test whether the instability is parameterization-dependent or topological.
Core interaction: Observe the instability bands; adjust IOR gradient; compare before/after.
Supported artifacts: transport-coherence-radial.png, datasets/transport-coherence-risk-nodes.csv, validation/transport-coherence-basin.md
Overlays: transport_coherence + validation_hud → heatmap_normals → atlas_labels
Validation question: 289 UNSEALED regions; all at precision 0.003125; symmetric around row ~90 (midline)?
Missing: Beauty render at resolution where 289 regions are individually distinguishable; live oracle querying.
Design files: sample_worlds/transport_coherence_basin_world/ — world.md · overlays.md · config.schema.json
Build Roadmap
Tier 1 (build first):
  1. dual_reality_view_world     — richest artifact support, most accessible
  2. observer_disagreement_world — self-validating via pixel counts
  3. hermetic_closure_world      — strongest validation story, clearest cliff

Tier 2 (after Tier 1 stable):
  4. cathedral_probe_world       — requires per-layer overlay runtime API
  5. transport_coherence_basin_world — requires live oracle querying
Full design documentation is at sample_worlds/README.md in the repository.